In part one of this article series, we talked about the basics of 3D laser scanning and how this cutting-edge technology has evolved from a buzzword into your mainstream data solution for generating precise building information across the AEC industry.
So, in this article, we’ll take a closer look at the steps involved in implementing laser scanning technology, which includes:
- Scanning
- Registration
- Data Clean up
- Exports
- Files transfer
- Let’s dive in!
1. Scanning
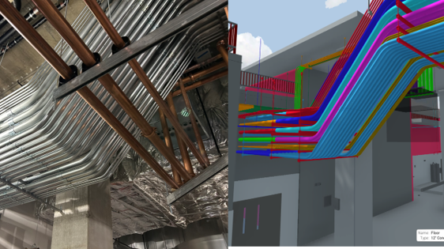
Laser scanning is as much about collecting accurate information as it is about creating impressive visuals. Since this technology has given us the ability to re-create any environment seamlessly, it’s crucial to identify the purpose and the desired outcome from the physical act of surveying.
Generally speaking, scanning any site can be broken down into a two-step process: Pre-site Work and Work On-site.
a. Pre-Site Work
Pre-site work typically involves understanding the extent of the work, knowing the information that needs to be gathered during the survey, essential areas to be covered, specifics of the site or the facility such as square footage, levels, elevations, ceiling types, existing building conditions, project timeline, to name a few.
Finalizing the extent of data capture is vital since that will form the basis of your proposed survey strategy and define the primary focus of the scan. Further, depending on the type of the work and the facility to be scanned, be sure to verify the necessary paperwork, including COI requirements, specific clearances, work permit, safety certificates, on-site contact information, unrestricted access to the survey site, and so on. Scanning during the pandemic and post-pandemic times might require you to adhere to an additional layer of safety and training to safeguard your staff.
Next, based on the existing information provided in the form of blueprints or photos, define a tentative workflow to be followed on-site to prevent loss of time and mitigate potential obstacles. Pre-site work, when combined with a detailed survey work path, can yield top-notch point cloud results, which form the foundation for all future models. Also, don’t forget to think about Plan B in the event of unforeseen complications arising on site.
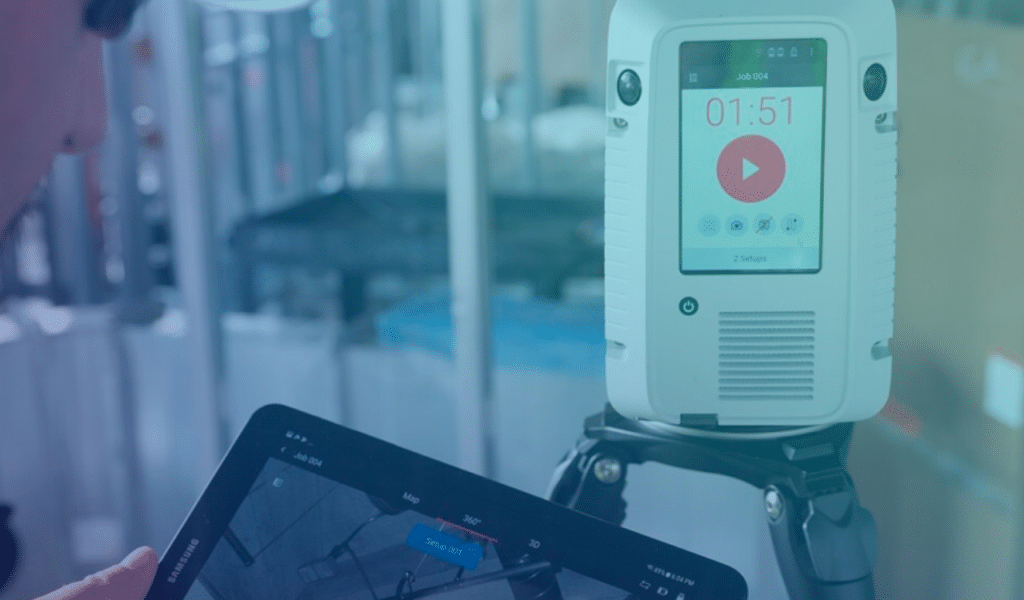
b. Work on Site
Before you begin scanning, review the information available to you and coordinate the removal of any objects such as tiles, access panels, furniture, scaffolding that might interfere with accurate data collection.
Based on the defined project parameters, the surveyor can begin the scanning work on-site and adjust the density of data points collected to reflect specific requirements. Try and stick to the work path to anticipate upcoming scan positions; however, be flexible enough to readapt your strategy per site conditions.
Further, pay close attention to the essential information that needs to be gathered on-site. Also, remember to incorporate plenty of field notes to help the user understand how the fieldwork was developed.

2. Registration
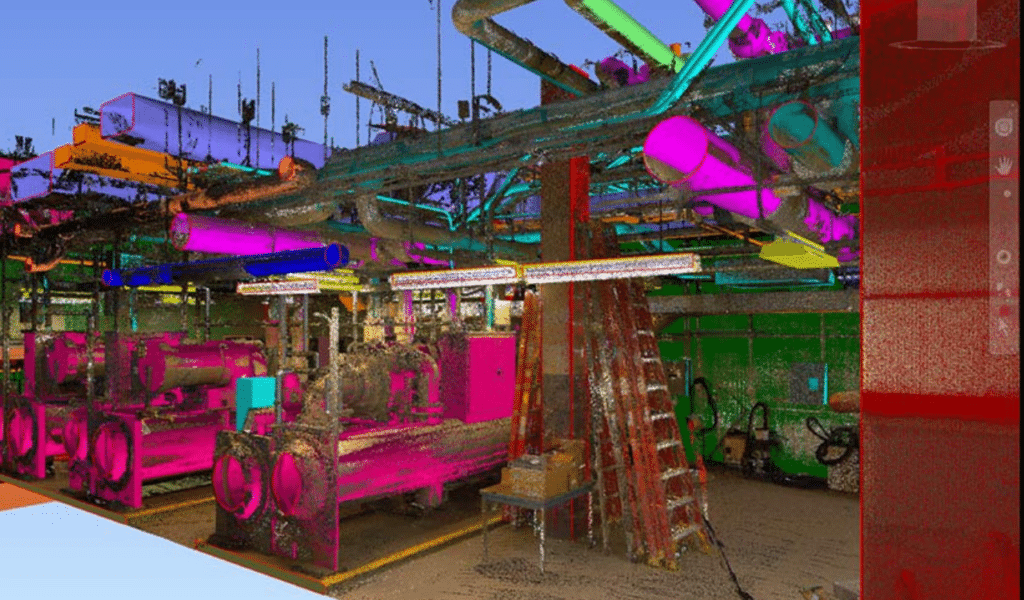
The process of registration is carried out in the office post fieldwork. Once the scan is completed, large volumes of data are stored in a compressed format on the scanning device’s hard drive. This data is then downloaded and processed to become the point cloud through a process known as registration. During registration, millions of overlaid data points are “threaded or stitched together” to create one continuous project point cloud. It is undertaken using software such as Cyclone, Scene, ReCap, among others.
During this process, false data points are removed. The point data is converted to a standard transfer format, spread spatially and homogeneously, describing the existing conditions inside and out. It’s good practice to pass scan positions on to the user to help them identify data points both in the point cloud and 3D model format to detect and resolve any potential conflicts.
Some service providers offer pre-registration alongside scanning to speed up the registration process. However, the quality of the scan will rely majorly on the precautions taken in the field, along with meticulous note-taking.
3. Data Clean Up
Once all the scan positions are stitched together, the registration process is complete, and it’s time to start the data clean-up process. This involves filtering any additional information picked up during scanning, such as digital artifacts, vehicles, trees, people, furniture, adjoining facility, measurement noise, etc., to ensure a high-quality point cloud for modeling.
Despite the apparent advantages of data cleansing, it’s often overlooked as it’s a time-intensive process. However, it’s recommended to take the time to complete this step to ensure a consistent scanned product.
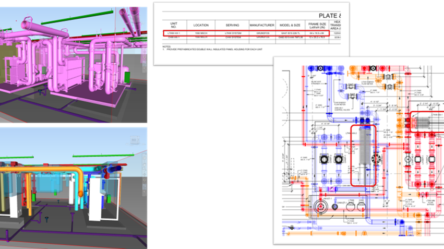
4. Exports
The deliverables can be exported using several universal formats supported by a myriad of design applications. However, in some cases, it might be necessary to convert them from one format to another to be used on specific software.
Most of our ENG clients use Autodesk Suite – AutoCAD and Revit, which require files from ReCap. So, in those cases, it’s recommended you request RCP and RCS formats or e57 to get the POD file while using Bentley products.
If you’d like to make a point cloud survey request with us, it’s beneficial to understand our design workflow. Getting as-built models can often be highly interesting over RCP or RCS formats. However, these formats are crucial for building models, so we prefer having data available in RCP and RCS formats in the event we wish to refer to the point cloud or insert it in Revit, AutoCAD, or Navisworks. This approach could help you avoid going back to the surveyor or the S2B models.
That being said, we can provide other point cloud formats such as unified and decimated point clouds, 360 photos, structured point clouds, which could be required many times over for pre-processing with automated geometry extraction software like Edgewise.
Another vital aspect to consider is the size of a point cloud. If you have a large project with multiple zones, areas, or levels, we recommend splitting the point cloud for ease of handling. At ENG, we try to keep the point cloud file under 10 Gigabytes.
5. Files Transfer
Files transfer is an essential yet time-consuming aspect that needs to be factored into your work plan. Standard principles of intellectual property and ownership of data apply to the project deliverables. Typically, the surveyor retains the information and provides a royalty-free license to the client to use it for defined purposes.
At ENG, we use ACC – Autodesk Construction Cloud for uploading, sharing, and storing the point cloud as it offers unlimited space.
6. Bonus – Licenses Needed
There are plenty of options to visualize and work with point clouds and 360 photos, some of which are free but come with limitations, while others require a paid license. Typically, the laser scanning service provider offers 360 photos viewer through applications like WebShare by Faro, JetStream (TrueView) by Leica, and 360 ReCap by Autodesk.
In addition, here are some examples to view and work with the 3D point cloud. It’s important to note that if you’re modeling, you might require a license to use one of the following applications:
- ReCap – You can view and fly through the 3D point cloud
- Open Software / Online Free Viewer (with limitations)
- CloudCompare
- Revit / AutoCAD / Navisworks – not a point cloud visualizer, but it’s possible to review the point cloud.
Final Thoughts
Building Information Modeling (BIM) and laser scanning have come a long way in the past decade. With its many practical uses, it has become the go-to solution for creating fast, efficient, and accurate surveying information for many construction professionals.
So, are you looking for quick and reliable data for generating precise building models for your next project? Look no further. Give ENG a call today to implement our most trusted and enhanced 3D laser scanning service to create and deliver your best project yet!
Did you miss part one? You can read it here.
ENG
For more information, contact us!
E-mail: eng@engbim.com
Call us: (949) 340-6924